Category Archives: Shooting

Night Shooting with Pan F+ and the Pentax 645

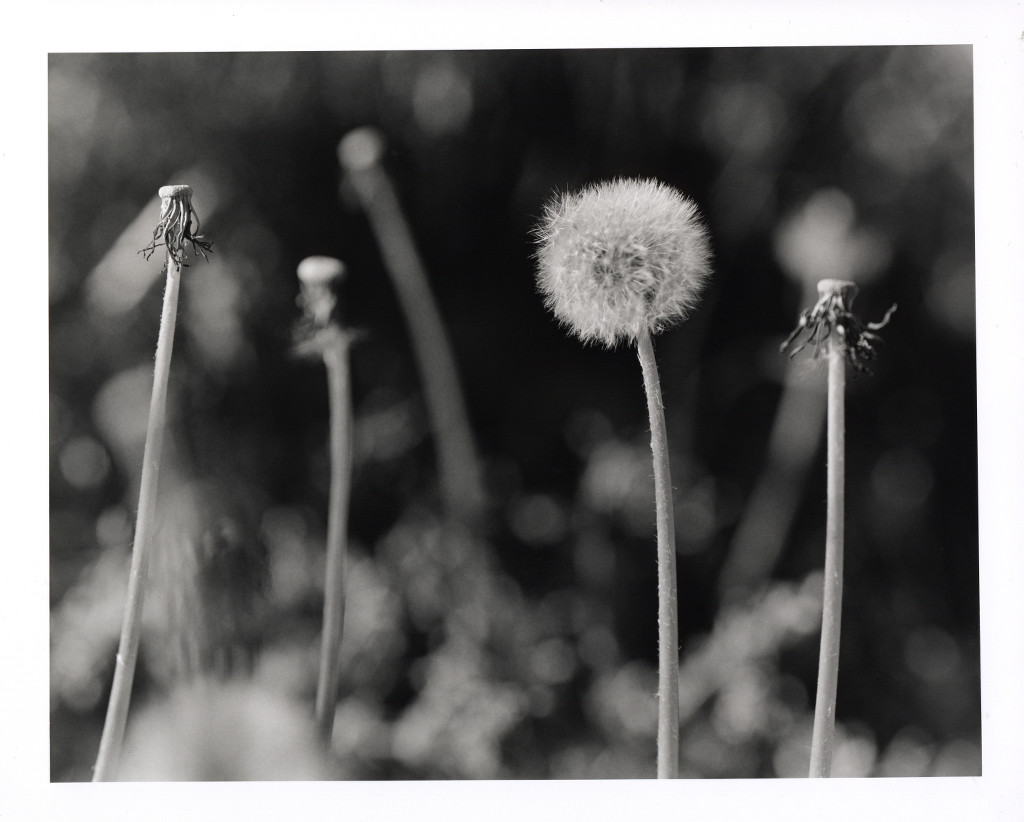
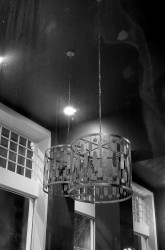
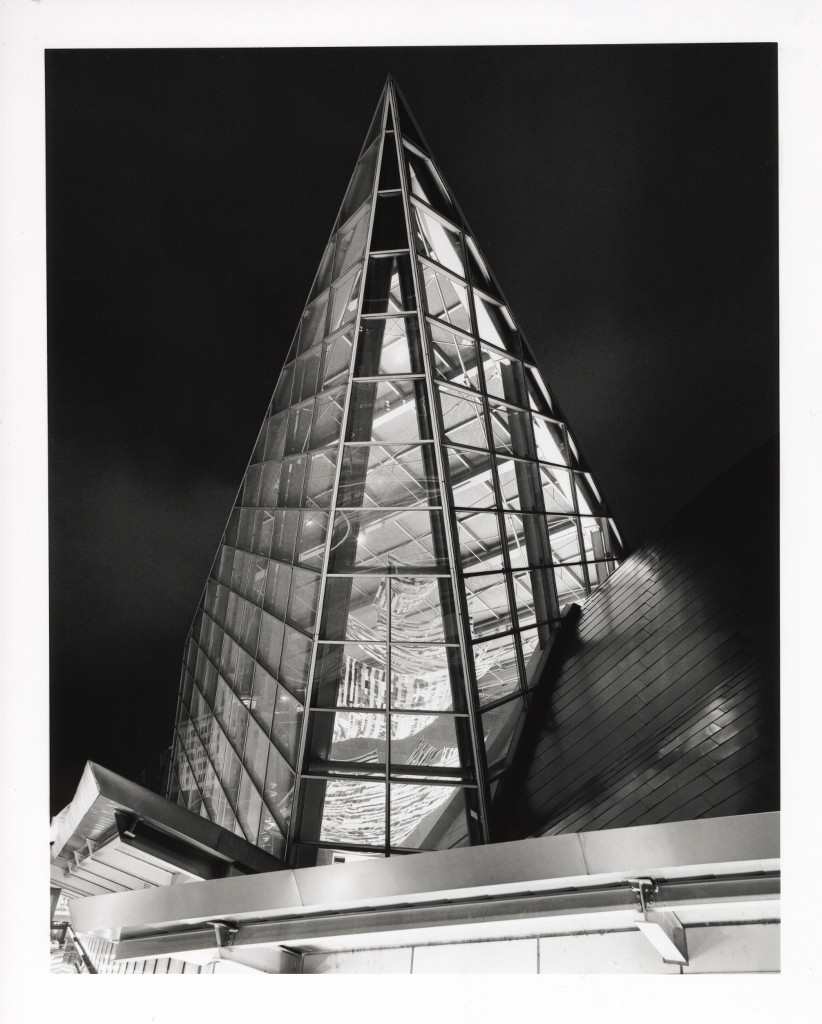
This is a shot I’ve revisited a few times, the first with a Canon F-1, 28mm lens and Kodak Ektar 100 film. Later, I went back with the same camera and lens, but black and white film.

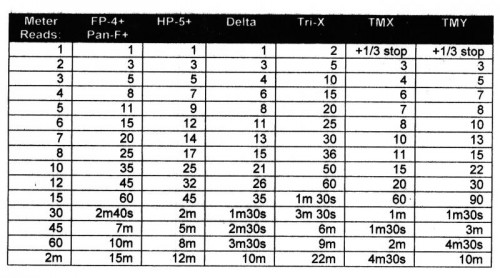
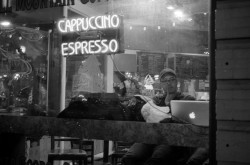
This time, I was walking around downtown Roanoke after dark with the Pentax 645 and 45mm lens (which has a similar field of view to the aforementioned 28mm on the Canon). For night time shooting I typically use my trusty old Gossen Luna Pro F in reflected light configuration and refer to the printed table I have taped to the back of it for times accounting for reciprocity failure.

I suspected this would be extra-challenging with Pan F and it’s tendency toward high contrast, but it wasn’t so bad. The negative came out contrasty but usable. Scanning it was easy, but the darkroom is always the true test of a negative’s character.

In this case, it was a fairly soft effective grade (printed split grade, with a very short exposure at grade 5 compared to the 00 exposure). A little simple burning in on the lower area helped keep it under control, otherwise it’s a straight print.

The detail on a 645-format piece of Pan F+ is something else. You can’t see it here, or even with the naked eye on the 8×10 print unless you look really closely, but under a loupe, about 1/3 of the way down, is a reflection of an illuminated street name sign which was somewhere behind me. On the print, and in a scan of the film, it’s amazingly sharp. That contrast though…I really need to work on the development time for this stuff!

All In A Line

All In A Line

Some time ago I was gifted a set of Vivitar Series 1 close-up filters in a size suitable for my Pentax 645 system. They’re simple, uncoated single element glass diopters, in +1, +2, +4 and +10 strengths.

With the 150mm lens, these can get you pretty close to your subject. Needless to say, you want to do this on a tripod. One nice thing about these is that they don’t affect the amount of light at the film plane. The downside is that they aren’t as sharp as a dedicated macro setup. But I have to be honest here, I’m overall impressed with the results so far. They can even be stacked, to a point (not all will fit together as the +4 and +10 bulge out quite a way, also image quality will really suffer with all those uncoated air-glass interfaces).

This shot was made using Ilford’s Pan-F Plus, a traditional style slow speed film. It produces beautiful tonality and fine grain, at the expense of slower shutter speeds and a tendency to get very contrasty, very quickly. But it makes very pleasing prints. In this case, the print is also on Ilford material, their pearl-finish resin-coated multigrade paper.

Other than figuring out which filter to attach to the 150mm, this was a fairly simple shot to make, and a straight print at a lower contrast (because Pan F+ and I’m still dialing in my development times with it).

Toying Around

I don’t often go for the toy camera aesthetic and I have a beef with those who portray film as being random, fuzzy and unpredictable because they think film photography and toy camera photography are one and the same.

But in the right hands, a toy camera can produce beauty. I’m not those hands, but sometimes it can be fun to go out into the world and shoot with something so basic that almost the only option is to decide on where to point the thing, and even that can be a challenge. A liberating act, a cry of freedom from the tyranny of perfect exposure and razor sharpness.

And once in a while, when the stars converge and the moon is in the seventh house and Jupiter aligns with Mars, some photons in the form of an image which is both good as a composition and technically pleasing will dance upon those silver halides, without being totaled by a random light leak. Magic will happen. I can almost understand why toy cameras are so compelling to some, because when they hit, they really hit, and they’re the absolute antithesis of the pixel-peeping, moar-megapixels, give-me-sharpness-or-give-me-death attitudes so prevalent in photography (particularly of the digital sort) today.

Anyway I took out my old Ansco Goodwin #2 box camera for a spin one morning, to see if I could make something for the FADU “disposable camera” shoot out and APUG’s Jan/Feb challenge. We’ll neatly sidestep the fact that of the 8 frames I shot, 3 were essentially unexposed, 3 more were so badly composed that they might as well have been blank, and only 2 had promise, with one in particular standing out. Such is the way of it when you make photos with toys. I’m grateful I got one really nice one out of the deal, and I had a bit of fun in the process which is never a bad thing.

This was it:

Roanoke RiverThe film was developed in Ansco 130 (yes, my print developer!) at 1 + 43 dilution (compared to normal 1 + 1 for prints), semi stand for 30 minutes with a single inversion at the 10 and 20 minute intervals; this is a topic for a future post but is proving to be a method worth pursuing. This is a scan from the contact sheet, showing the full 6×9 frame with overscan. I plan on making an enlarged print from this negative, cropped in a little and with the horizon leveled.

Some Night Time Shooting with Ilford FP4+

A couple of weeks ago I went out on a night-time photo walk in downtown Roanoke with the Exposure.Roanoke group. It was my first time shooting FP4+ at night and with it being a traditional grain film, reciprocity failure is to be expected.

I didn’t want to bet an entire photography outing on guesswork, so did a lot of hunting around for reciprocity charts. I don’t entirely trust the official Ilford ones, to be honest. It seems a mite suspicious that they show identical charts for all their films, even the modern “core shell technology” Delta line which should have much better reciprocity characteristics.

I had a great set of reciprocity data for HP5+, found in an old Photo Techniques article by Howard Bond, but it did not include any figures for FP4+. Eventually, after much searching, I found a chart online with data for several films and which closely matched the HP5+ figures which I knew to be reliable.

reciprocity-chart

I must confess I can’t remember where I found this, and I didn’t note it down. It was on one of the forums, possibly the Rangefinder Forum or Large Format Forums. Since I’m mostly sticking to traditional grain type Ilford films (Pan F+, FP4+, HP5+) I printed those columns, sized to tape onto the back of my Luna Pro F meter. I exposed at EI100 using the 30 degree reflective averaging metering method. Development was in D76 1:1.5, using the official box speed time for this film in D76 1:1 and inverting once every 30 seconds.

The gallery below shows quick (no spotting done) film scans from the roll.

I’ll be interested to see how they print, but the scans certainly look promising.


Why color print film rocks (sometimes)

I don’t do a whole lot of color shooting, in fact most of what I do in that regard is strictly of the family snapshot variety and occasionally grabbing a shot of something which just suits color better.

In truth, this is the sort of shooting which would be ideally suited to digital but right now I generally use the family SLR (a Minolta Maxxum 5000AF) for it. It’s a lightweight, auto focus, auto exposure, motor driven camera. With a 35-70, 100-200 and a “nifty fifty”, plus both the small flash unit (1800AF) and the recent addition of the big gun of the lineup (4000AF) offering TTL flash exposure it has the bases well covered for that type of shooting.

This lets me keep the Canon F-1 loaded with black and white film, without having to swap around rolls.

The last roll of color film I shot was Fuji Superia Xtra 400, available in all kinds of places. It looks great scanned and should print to huge sizes without much problem.

The thing I like most of all about this film, though (and color neg in general), is the exposure latitude. That last roll had a great many bounce flash shots which were underexposed by 1-1/2 to 2-1/2 stops (Sunpak auto-thyristor flash on Canon F-1 for this roll, not the TTL-equipped Minolta rig). Any number of things could have caused this, but the point is that I was able to get good images even then.

My scanning is standardized for color work. I have preset Vuescan configurations with film base color, exposure etc. locked in so that a well-exposed negative of a sunlit (or electronic flash-lit) scene will render well-exposed and properly color balanced. I scan as 16-bit TIFF to allow plenty of wiggle room for exposure and white balance adjustments.

And wiggle, I can! Take a look at this example, as scanned. Hah, fooled you, auto thyristor flash!

Bennett 1 week old

About a stop and a half underdone, as demonstrated by pushing the ACR exposure slider on the TIFF by about that much, leading to this:

Bennett 1 week old

Yeah, that’ll work. Colors remain where I want them, grain is good too (even on 100% zoom on the original scan). But how far can I push it, how much detail is there hidden away in those dark corners? Let’s goose the exposure all the way over, turn the contrast curve up to 11 and see what emerges out of the shadows!

Bennett 1 week old

Wow, tonal detail in that dark area in bottom left. And green speckly scanner noise. I don’t recommend this. But there is some tonal information hiding in there if you want it.

But wait, there’s more! What if I tackle this specific frame with scanning settings tailored toward an underexposed negative?

latitude-test_4

Honestly? I don’t see much difference in any way that matters. Either way, I get a very usable result! Yes, cranking the exposure up reveals less scanner noise in the dark areas, but it’s not like I was going digging for detail in those anyway.