Category Archives: Shooting

More on square portraits

Another way I’ve found square compositions to work with portraiture is in the three-quarters length, where I might want to convey a less-intimate feeling while giving the surroundings some love. A vertical composition would cut much more of the environment out, while switching to a horizontal composition would cause the subject’s surroundings to be emphasized more heavily.

Kelli Riverside

Here, we see a 3/4 length portrait of Kelli in a square composition. There is enough width in the square to be able to show that it’s quite a wintry looking day down by the river; the trees are bare and the sky overcast. Brrr! A vertical crop would have cut much of the surroundings out, which in this case I wanted to keep. A horizontal composition would have given the surroundings too much emphasis, or would have forced me to change to a closer-up portrait, which wasn’t my intent here. The square gave me a perfect balance. Putting Kelli slightly right of the frame helped balance the treeline. Alternatively, I could have moved to my right, filled the background evenly with trees, and positioned my subject dead center for a more symmetrical composition, which also works well in a square.


Square portraits

I tend not to do much portraiture, but occasionally I’ll sit my wife down and make a quick portrait, compelled into doing so by her obvious beauty (which she, apparently, is blind to).

In the course of this I’ve been finding that I quite like black and white, square format head-and-shoulders portraits. There’s something about them which seems to work. As ubiquitous as the 2:3 ratio is it feels terribly confined to me sometimes. I’m looking at a couple of 4×6 prints I have framed and as pleasing as they are, I get a slight uneasy feeling that the sitter is thinking “Help! I’m trapped in a telephone box! Or a small elevator! Get me outta here!”

One of the things I’m enjoying about square format is how it can “breathe” in both horizontal and vertical directions at the same time. This really seems to help where headshots and head-shoulders portraits are concerned, which when you think about it can be “kind of square” subjects.

Kelli, square format portrait

I feel that this head-and-shoulders shot works much better as a square. To fit a typical portrait-oriented composition, I’d have had to include more of the chair, or else retain the vertical coverage at the expense of Kelli’s arms. Except they are an integral part of the pose here.

Sometimes You Just Get Lucky

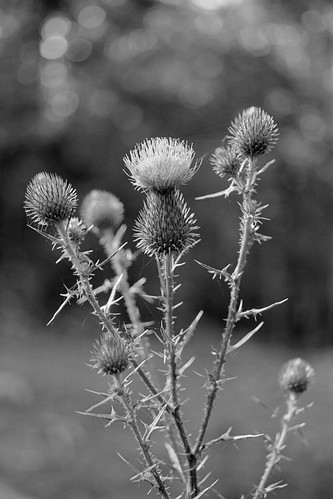
A little piece of Scotland beneath the Blue Ridge Parkway

This is one of my favorite recent photos, taken underneath the Blue Ridge Parkway just east of Roanoke. The fact that it exists at all is little short of a miracle.

I was out with several other local shooters, exploring the hiking trails in the area. One trail goes down to the Roanoke River, the other runs beneath a very tall road bridge which carries the BRP over the river. While everyone else was down by the river’s edge, I decided to try for something different and wandered off the trail under the bridge. My plan was to find a view looking over the river. What I found was heavy undergrowth leading to a sheer drop into the river; certainly nothing I could get a pleasing vantage point from.

Fortunately, as I made my way back toward the trail I did notice some extremely tall thistles and other interesting weeds among the undergrowth and set up to shoot a close-up of this one. Between the slow film (Ilford’s Pan F+, an ISO 50 film), aperture needed for appropriate depth of field and the shady location, I was down around 1/8th of a second.

So the camera was stable enough perched on its tripod, but the 5′ tall thistle was…well…oscillating. Every time a breeze blew up, it would swing back and forth like an upside-down pendulum. Muttered attempts to convince the relevant authorities to knock it off with the wind already went unanswered.

So I decided to frame the thistle so that it would be where I needed it to be as it hit the apex of its swing, in that brief moment of no motion. Stared into the viewfinder, waited for the stars and planets to align, and hit the shutter release at what I hoped was the moment.

Then moved on, because I didn’t have all day and I didn’t have a lot of film left on me. Either I got it or I didn’t, and I wouldn’t know until I saw the negative.

One of the neat things about shooting film is how you get surprised, at least when the surprise is pleasant (more usually, it isn’t). I fully expected a badly-framed, blurry shot of the thistle, perhaps even with the faint hint of an imaginary grin on its imaginary face as it hustled out of my ruined photo, mocking my meager attempt to capture it; but no, what I got was the above, sharp enough that the fine threads of a spider’s web are visible draped around it. I didn’t even notice those until I saw the negative! It’ll make a lovely print, for sure.

Backlighting transparent objects with strobe

As a film shooter, I can’t just make a rough guess at flash exposure and then dial it in from there by test shots. Well, I can, but the turnaround time is a little high using regular film and doing it with Fuji pack film like the commercial shooters used to do isn’t cheap even if you do have a camera which accepts a Polaroid back (I don’t).

This is why, when I splashed out and bought a handheld meter, I made sure it also had flash metering capability. This makes it very easy to get a good exposure for reflective subjects, just point the meter back at the flash and have at it.

But it wasn’t at all clear how this would translate to subjects which allow light to pass through. Would metering as normal produce a transmissive object with the right amount of “glow”?

So as any good science-and-logic oriented person would do, I performed an experiment, with 5 shots bracketed at -2 through +2 stops from a normal meter reading, in 1 stop intervals. The flash was aimed from behind and to one side of a clear lead crystal candlestick, and goboed to prevent any output directly striking the lens.

The results were as follows, all shots being straight “proof scans” from the negative (made through the clear binder sleeve, so disregard any hairs or dust) with standard setting of white and black points for the film and development used; my normal method of proofing a complete roll.

The shot as metered (center) has a very good overall “glow”, but depending on intent -1 would also work and +1 might be OK for some cases. This is good enough to satisfy me that I can get the result I’d like. I haven’t tried lighting from beneath a clear object but this would obviously be a good point to start from as it’s the same basic principle.

A more complete shot would usually also include some degree of lighting to fill in the shadows, of course.

Guitar Man

Guitar Man

So, out shooting around Grandin Village and I’ll be darned if this guy didn’t come walking around the corner. Not what you expect to see often, though perhaps it’s not unusual around Grandin Village.

A moment or two of uncoordinated bluster and almost without thinking, I’m asking if he minds me taking a photo of him. “No” he says, and strikes a suitably musical pose.

“Ka-Chunk” goes the F-1, I wind on and thank him. We head off on our separate artistic ways. I could get the hang of this street portraiture thing, perhaps.