In part 1, I made a contact sheet at grade 2 from a roll of Kodak BW400CN. Results were good enough to suggest a printing attempt would be worth pursuing.
I chose this frame from the other roll I made contact sheets from:
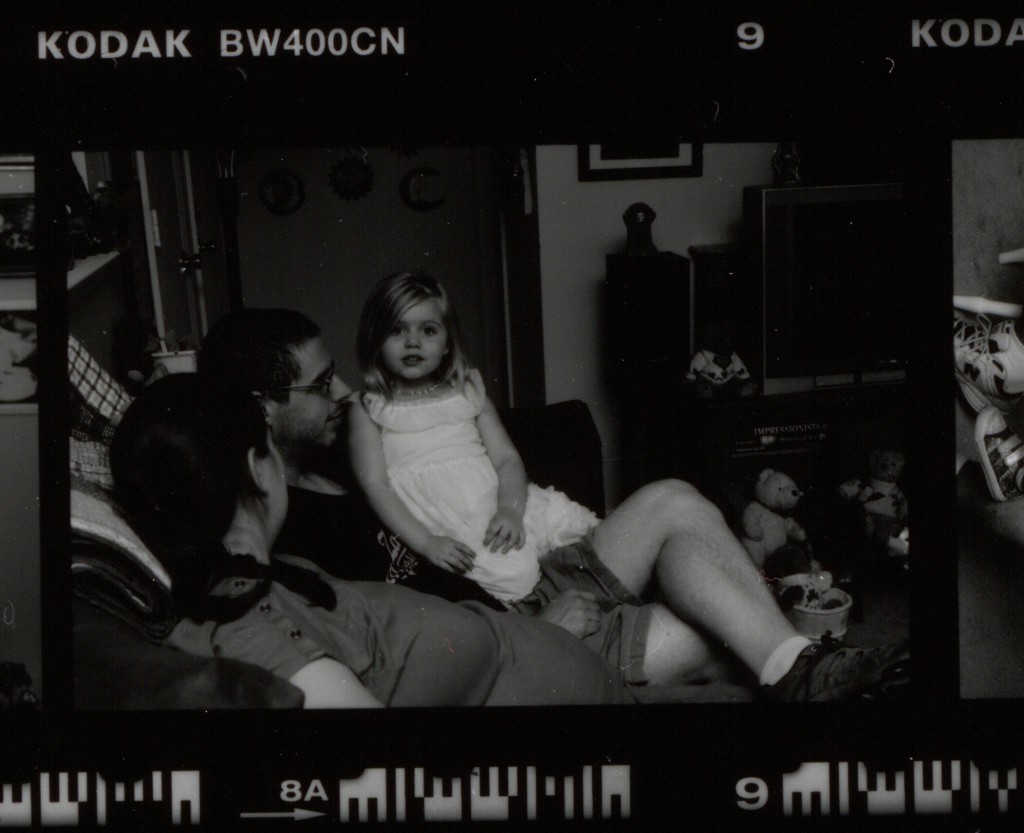
It’s underexposed and low in contrast with shadow tones smushed together in the darkness and very depressed highlights. I was bouncing flash over my shoulder, and while the flash insisted it was successfully exposing with its little green “yeah I’m good” lamp, I have to wonder if I didn’t have the thing set wrongly. That, or the white dress was really throwing the auto-thyristor circuitry for a loop.
Anyway, focusing this was kind of tricky. Those chromogenic dye clouds don’t pop into focus nearly as well as the grain on traditional black and white films. But still, it can be focused.
Having no idea at all where to start with exposure, I picked an arbitrary f/8, grade 1 and whole stop increments from 2 seconds to 32 seconds. A whole stops strip is intended only to get into the neighborhood of a useful exposure time and contrast grade or else tell me I’m way off and need to change the lens opening or adjust neutral density filtering. With most B&W films I find myself having to add neutral density into the light path to get manageable exposure times without leaving that warm and not-fuzzy f/8-f/11 comfort zone, but given how dark the mask is on BW400CN I skipped the ND entirely. I also chose to use some of the Adorama VC RC Perle paper which is a bit more than a stop faster than MGIV, plus I have 5 sheets left which I need to get used up before I standardize fully on MGIV.
Anyway, in making a whole stops sequence, I start with my base exposure, in this case 2 seconds. I cover the first part of the paper with a card and expose for the same as the base time, another 2″. The exposure time is doubled for each subsequent segment of the test strip.
So, in this case, my sequence was 2, +2, +4, +8, +16. Segment 1 gets 2 seconds. Next gets 2+2 (4). Next gets 2+2+4 (8), then 2+2+4+8 (16) and finally 2+2+4+8+16 (32).
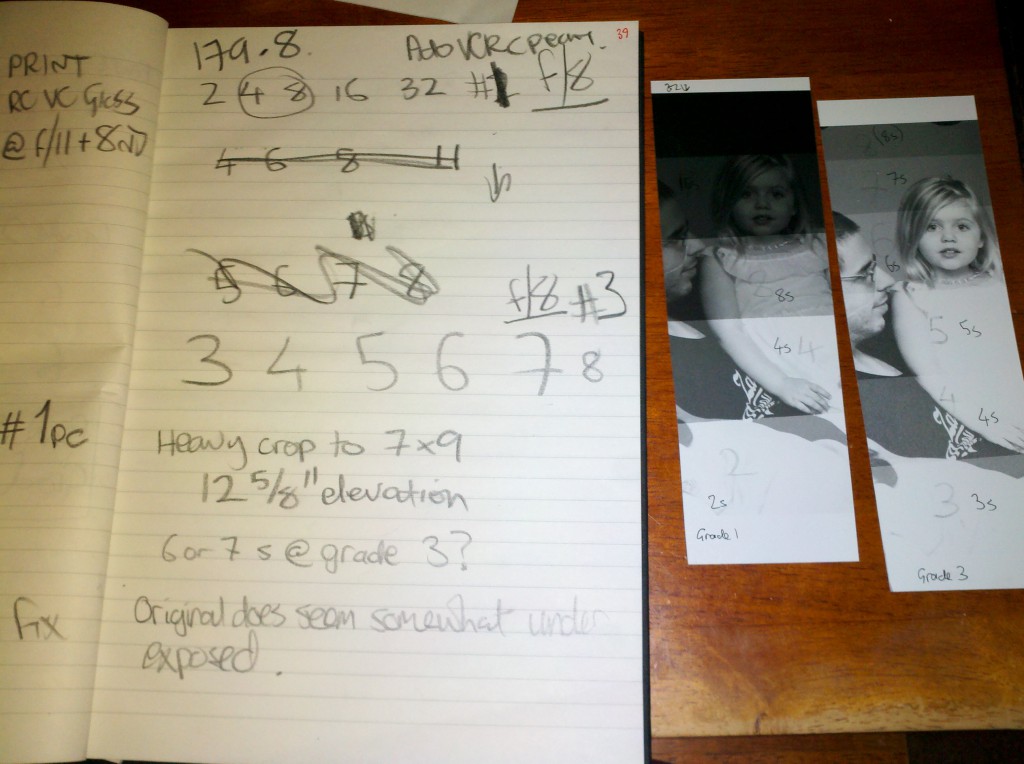
This may look like a mess, but it does have meaning. It’s written big and heavy using 6B graphite because I have to be able to read it in dim red safelight conditions, so big and bold is the order of the day here.
The first test strip suggested grade 1 and 4-6 seconds would be a good starting point for some fine tuning on the highlights, but not even close to contrasty enough for decent blacks, so I made a (rash?) leap, changing the grade and calculating a corrected exposure to bracket around, rather than bracketing another strip at grade 1.
Because I was cheap and picked up a set of ancient Kodak Polycontrast filters in lieu of Ilford Multigrades, each grade requires some exposure compensation. For now, I work with the numbers I found online, which suggest my jump from grade 1 to grade 3 requires a correction of 1.33 times the grade 1 exposure time for the same highlights (a separate post awaits regarding these filters). That would put my ideal exposure in the range of 4*1.33 to 6*1.33, or about 5.5-8 seconds.
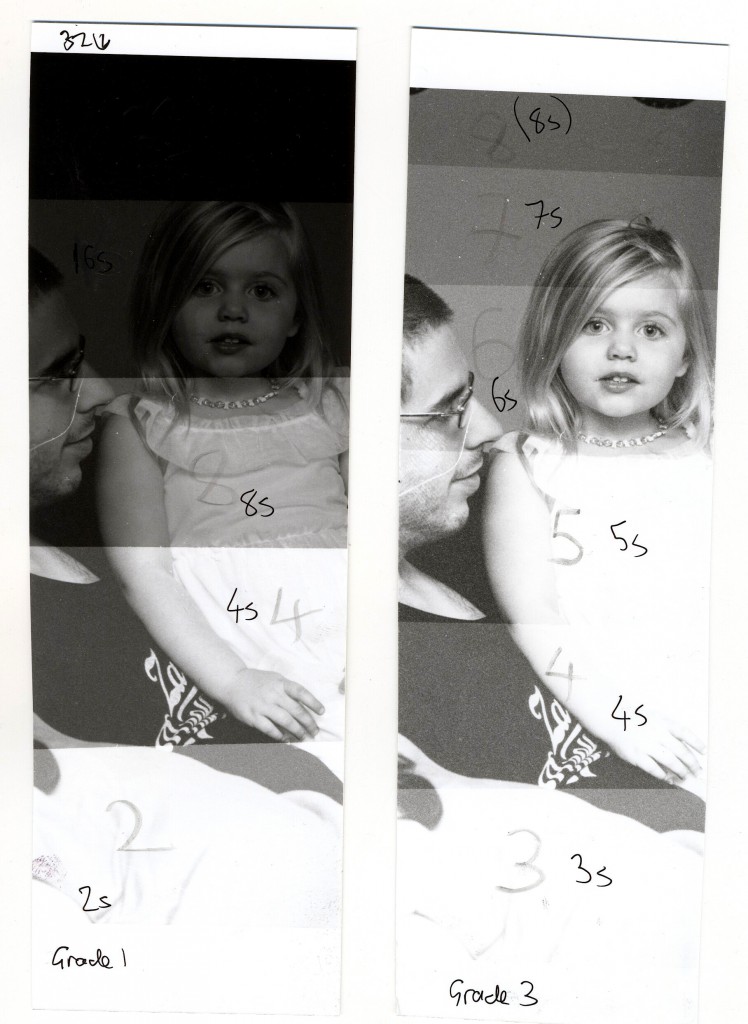
On the left, my initial try at grade 1, in whole stops on a 2-4-8-16-32 second sequence. On the right, a grade 3 sequence centered around what I calculated to be the right starting point, 3-4-5-6-7-8 second sequence. Made on Adorama VC RC Pearl paper, EL-Nikkor 50/4 @ f/8.
Well, well. Looks like 6 seconds could be close to the cheese here. Also, surprisingly grainy (but not unpleasantly so), probably due to the underexposure combined with cropping somewhat heavily into the 35mm frame.
My next darkroom session will extend on this result, starting with a grade 3 f/8 exposure sequence of 6, 6.5 and 7 seconds (or more likely, f/11 and 12, 13, 14 seconds) with strips running top to bottom so as to get the white dress, skin tones and some of that black t-shirt in the test zone. I really should have concentrated on that area for these first tests. If I had done that I’d have much more useful information on those critical 6 and 7 second segments, as it is they show little to no highlight areas of interest. Oops.
The result of that test strip will inform a first work print, which will give me some idea as to whether dodging or burning is called for, or if trying to print from BW400CN is just a blockheaded notion doomed to certain failure. More to come…