A few nights ago I finally made my first printing attempts. By all accounts it went well for a first try.
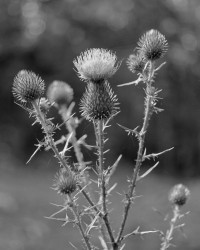
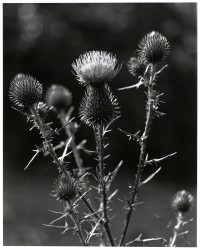
I chose one of my favorite negatives, a shot of some thistles made on 35mm Ilford Pan-F Plus and developed in Rodinal 1+50. It looked like it should print straight without needing dodging or burning and is a good sharp negative on fine grain film with interesting fine detail.
My first step was to make a test strip. Since I had absolutely no clue what would be a good starting point, I went with exposures of 1, 2, 4, 8 and 16 seconds at grade 2.5 and f/8 on the lens. This got me in the ballpark, but with an incredibly short exposure, under 3 seconds. I want to stick around f/5.6-f/11 with this lens whenever it’s practical to do so. Beyond f/11 I can see the grain become visibly less sharp due to diffraction!
Now, 3 seconds is OK if I just want a straight print. But it would be difficult to effectively dodge or burn if necessary, so I wanted to see how I would fare with an ND filter under the lens.
Turns out it works well. My regular 52mm 3-stop ND sits nicely below the contrast filters in the Beseler’s under-lens holder. A new test strip in whole stops, then another in half stops, suggested a time. I exposed and developed the full frame, only to find that it was rather underexposed. So I gave it another stop of exposure on the second try. Much better, but too high contrast. My shadows were about right but highlight detail was missing.
Now, I know enough to be aware that, to gain highlight detail, I need more exposure. But then I have to reduce contrast so as to avoid blocking up the shadows.
The next night, I returned to my darkroom, this time with a plan to use the softest grade available to me (grade 1 on my old Kodak Polycontrast filter set) and give a little extra exposure time (minus the 3 stop ND, which I decided to not bother with since I’d not be attempting any manipulations during printing). I figured an extra stop exposure, and ran a test strip which showed me I wasn’t far off. About an extra half stop, in reality.
At the last moment I hedged my bet and went halfway between what the test strip told me and what I had originally guessed. 3.5 seconds, f/8, grade 1.
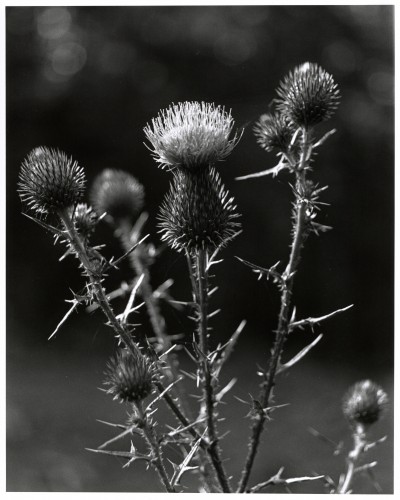
This is a straight scan from the print, with the black point adjusted to match visually what the print looks like (the white point was fine straight out of Vuescan). Screen and print are quite close in this rendition. I should have gone with what the test strip tried to tell me though, I think this is just a tad too dark overall. Still very happy with it and the highlight area at the head of the main thistle which was flat white in my first attempts has really livened up with the lower contrast and extra exposure revealing detail. Some of the brightly lit leaves and thorns still lack detail, but in looking at the older scan from the negative, I don’t think there’s any detail in the negative to begin with. Turns out it’s a lot higher contrast than I thought…it may even want a small amount of burning in the bright area of the thistle’s head.
So what have I learned from these first print sessions?
- I second guessed my test strips and came up wrong. Part of the problem is that I rough cut some test strips and made them too narrow, so it’s hard to properly interpret the result. My full size print test strips moving forward will be 4 from a sheet of 8×10, 2.5×8 inches each. Plenty to cover a good sample of an image destined for 8×10, but still reasonably economical. For test stripping my contact sheets I’ll use 1″ wide strips since I’m mostly interested in getting the film rebate to maximum black.
- Also part of the problem was I jumped straight to the print without bothering to make a contact sheet first (since I already had my digitally scanned contact “sheet” as a basis). A proper contact sheet is a must; scanning and enlarging a negative give quite different results. From now on, any negative I enlarge I’ll first make a contact sheet of that roll if I don’t already have one.
- My solutions to negative pop and focus shift seem to work well. I’ll detail them in another post.
- My second night’s print session I brought in a pail of fresh water. This gave me somewhere to rinse chemicals off my fingers (even though I’m using rubber gloves right now), and a convenient supply of water to clean up drips and small splashes while working and give a quick first rinse to my trays immediately after returning the chemicals to their respective bottles.
- Disposable rubber gloves are a pain.
- My handy home made test strip guide with exposure guidelines written on it was a great idea. It’s a rough-guide-math-in-my-head approach to cumulative exposure in whole and approximate half f-stops. I think it warrants a post of its own also.
- I can convert to darkroom use, set up, run test strips, make a work print, clean up and revert to office use in just about an hour. If I don’t have a good hour to work with, I need to leave printing until another time.
- Washing in a tray in the bath is kind of a pain. I’m looking at building a DIY vertical washer using a plastic file container.
- A foot pedal for my timer wouldn’t hurt.
- The metronome approach to process timing works well.
- Darkroom work is potentially addictive! The satisfaction gained from making a print I’m pleased by is orders of magnitude greater than that gained from making a perfectly post-processed digital file from a film scan.
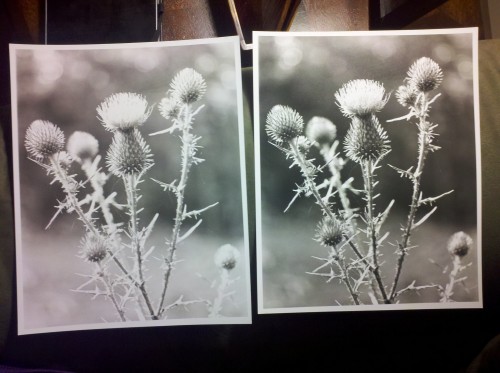
Speaking of that, here’s a side-by-side of my print scan and the previous film scan I’d done.
 Â Â
Film scan on the left, print scan on the right.