One of the things you find when working to a tight budget is that cheap yet effective and resourceful solutions can gain you a lot of mileage.
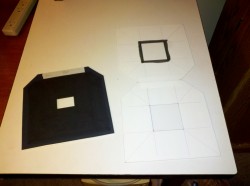
Homemade negative holders, cut from sturdy illustration board, hinged using linen hinging tape and black ink applied.
For one thing, my enlarger came without negative holders or the filter holder which fits in the drawer above the condenser. Luckily, the Beseler 23C series have a simple style of negative holder. Using some sturdy illustration board in the darkest color I could find (dark blue) I made a couple of holders for 35mm and 6×6. The holes are cut using a regular bevel matboard cutter. Placed in the enlarger’s negative stage, they’re held quite flat. The filter holder is less of a concern since I scored a cheap set of under the lens Kodak polycontrast filters in excellent condition. Eventually I’d like to replace them with above the lens Ilford Multigrade filters, but this solution will work fine. However, with no filter holder in the drawer, there is a lot of light leakage. To solve this problem I cut a suitable frame out of heavy cardboard (the box the enlarger was delivered in). I should probably black it out or paint it white but it works very well as-is, blocking the light leaks up there. Heat hasn’t been a problem; the lamphouse does get warm but it’s nowhere close to hot enough to burn this material.
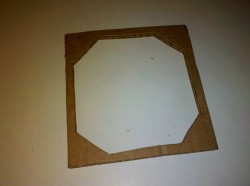
Filter drawer insert. Heavy cardboard from the box the enlarger arrived in, cut to size.
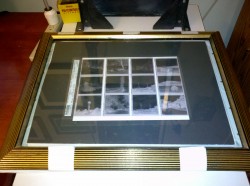
Finally, a frame for making contact sheets from my negatives. This is a simple device, a flat board which the paper and negatives can sit on, with some glass pressing them down flat. I hit on the idea of finding a cheap frame, 11×14 or larger, and using existing materials to make a back which it would hinge to. In the event, I found a large frame with glass in it, but no back, for a steal at Goodwill. After cleaning it thoroughly I bent down the metal tabs which usually hold the back on the frame so that they would hold the glass securely in place and removed the hanger from the back. A base was made by sandwiching layers of heavy cardboard (more of the enlarger’s delivery box) together, followed by a layer of black posterboard. This was hinged to the frame using duct tape. A pair of securing clasps was made from more duct tape. Some craft foam on the bottom helps keep it in place on the enlarger’s baseboard. I marked an 8×10 area in the dead center of the base to make it easier to set up. I can place the frame on the baseboard, set the elevation to a standard height, put my 35mm holder in and adjust the lens focus until the lit area is a little larger than the marked area. Under safelight, place the paper in the marked area with the negatives on top, close the frame and secure it down, then expose.
-

- Opened and ready for paper and negatives
-
- Loaded and locked, ready to expose.
-
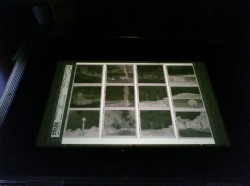
- Exposing the contact sheet
It’s large enough to place two sheets of 8×10 side by side if I really wanted to. If I need to contact print on larger paper (for 6×7, perhaps, if I should ever end up with something like a Mamiya RB) I have more than enough room to do that. I could even use it for contact printing negatives up to 11×14. Total cost to me: about $2, some stuff I already had lying around the office and 30 minutes of free time. Not everything can be jury-rigged in this manner though. I investigated options for cheap developing trays but the truth is, a new set of 3 can be had for under $10 (8×10) or $17 (11×14). I might be able to cobble something together to work with 8×10, but it’s going to cost close to what I’d pay for the proper tools anyway. Most of the ones showing up on Ebay aren’t any cheaper than new ones either. A magnifying glass of good enough quality to use for focus checking is no cheaper than a used grain focuser, if you’re patient enough and watch the auction site for one.
But for the things which can be fabricated out of “junk”, it can be worthwhile.